
django
It may seem like I’m writing this for you, but I’m actually writing it for myself. I’m writing this so that I can better understand what I’m doing and digest the material by explaining it. Also, when I write this down it serves as notes. I’ve often written material that looks like technical writing, but is in fact a tutorial for me to look back at later.
Getting Started
First thing is to create a virtual environment. We do this so that our Python packages are localized instead of installed system wide. We do this to reduce the risk of conflicting packages, it’s easier to release, and it’s easier to switch to another Python interpreter.
First install virtualenv (on Linux):
$ sudo apt install python3-venv
Create your virtualenv:
$ python3 -m venv .env
You can name your virtualenv whatever you’d like. I prefer to call mine .env because it’s simple and hidden. This is also the naming convention from RealPython. Others prefer to call it the same name as their project.
Activate your virtualenv:
$ source .env/bin/activate
Install Django:
$ pip3 install django
Create Project:
$ django-admin startproject ‘PROJECT NAME’ .
Create a project app:
$ python3 manage.py startapp ‘APP NAME’
Run your Django server:
$ python3 manage.py runserver
In the browser navigate to http://localhost:8000 and you will see the django is up and running. Open your favorite IDE. The barebones project has been created for you. This would also be a great time time make your initial push to Github (or Gitlab or whatever you prefer).
Register the App
Navigate to ‘PROJECT NAME’/settings.py in your editor. You should see an array called INSTALLED_APPS. Add to the end of the array your app, APP NAME.

The app I’m adding in this case is called ‘blog’
Build Routes
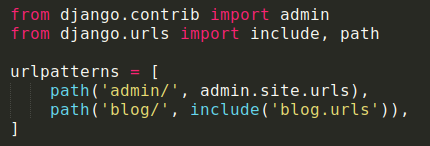
Navigate to ‘PROJECT NAME’/urls. You can see how Django is directing traffic within the urlpatterns array. We want to create new paths that will direct to our new app(s).
If you go to http://localhost:8000/’PROJECT NAME’ you will see that nothing shows up, even though you registered your app in the previous step. In order to get this to work we need to build routes.
Django tells us how to do this:

if I’m adding a blog it’s going to look like this:
However, if you try to navigate to your project it still won’t work. If you check your terminal where your Django server is running you will see an error that says:
ModuleNotFoundError: No module named ‘blog.urls’
This is because we don’t have a file named blog/urls. So we need to create it.

This by itself isn’t enough to solve the problem. We need to configure it!
The new urls.py file looks very similar to ‘PROJECT NAME’/urls.py, but it’s going to be a little different.
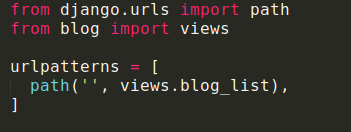
remember that my app name is ‘blog’, yours might be called something different.
Right now I’m still getting an error in the terminal saying
AttributeError: module 'blog.views' has no attribute 'blog'
So I’m going to navigate to blog/views.py where I’ll need to create the blog_list function

Now this still doesn’t work because we don’t have any templates, meaning there’s no HTML for the browser to read. So if we go to localhost:8000/blog we will get an error that says:

Creating a Template
First thing to do is to add some functionality to our function blog_list.

This will still render a ValueError at /blog/ error as shown above. This is because we don’t have any HTML/CSS yet!
Inside of the blog directory I will make 2 new folders with a file inside:templates/blog/index.html
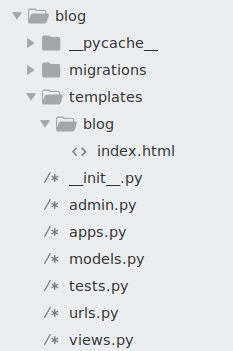
At this point we can go into index.html and start doing some HTML formatting. However, we’re going to wait on that.
Models
If you want to make a website that’s more than just static pages you’ll want to use a database. Models are how Django interacts with a database. Each database table has its own model. Sometimes tables need to reference each other. This tutorial doesn’t get into that, but will be discussed at another time.
Basically, a model is a class object that converts into SQL language. Different projects will require different types of models. For more information see Django Docs.
Different projects will require different types of models. This topic will be discussed in another post.
No comments:
Post a Comment